.jpg "family smiling at kitchen table")
How to Maintain a Water Heater
Purchasing a new water heater or replacing your current model can be expensive. Get the most out of your water heater by performing routine maintenance
Benefits of Preventative Hot Water Heater Maintenance
When your water heater operates at peak efficiency, it uses less energy, translating into lower electricity or fuel costs
Proper water heater care also removes sediment buildup and corrosion to improve the taste, feel, and overall quality of your water
Noticing and fixing minor issues with your unit can prevent big problems and save you money on repair and replacement costs
Preventative maintenance increases safety levels in your home by preventing electrical and gas issues
Safety First
With a little attention and maintenance, you can keep your gas and electric water heaters working efficiently. If you’re not comfortable working with gas or electricity when caring for your water heater, however, call a professional.
Caution
Always wear gloves, goggles and other protective clothing while performing maintenance on your water heater.
Water Heater Maintenance: The Components
The Temperature & Pressure Relief Valve
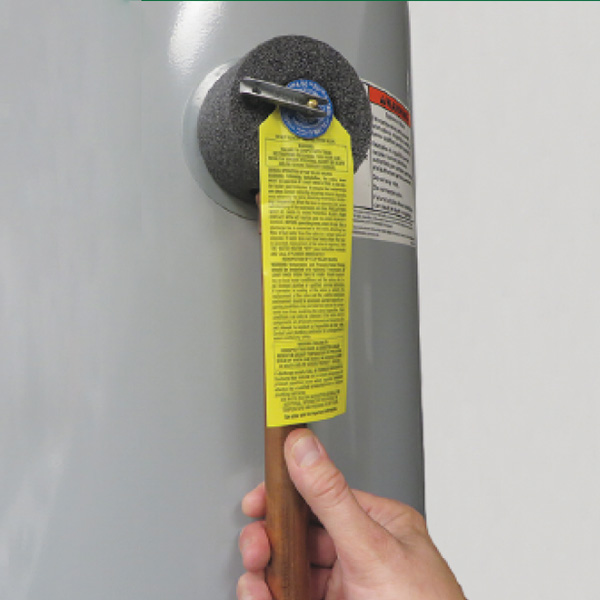
T&P Valve with Instruction Tag

Opening T&P Valve
Both gas and electric water heaters have a safety device called a temperature and pressure relief valve, or T&P valve for short.
In the event the tank is over-pressurized, the relief valve opens and releases the pressure. If the valve doesn't operate correctly, the tank can over-pressurize and explode.
Simply lift the lever to open and close the T&P valve a few times to make sure water is discharged from the tank. Inspect the Temperature and Pressure (T&P) relief valve per instructions on the valve’s label.
T&P relief valves will drip if the water pressure is too high or due to thermal expansion on a closed plumbing system. Control water pressure and install a thermal expansion tank before replacing a dripping T&P relief valve.
Find a local pro to help with this issue
The T&P valve should be inspected by once a year by the consumer and every 5 years by a professional.
The Anode Rod
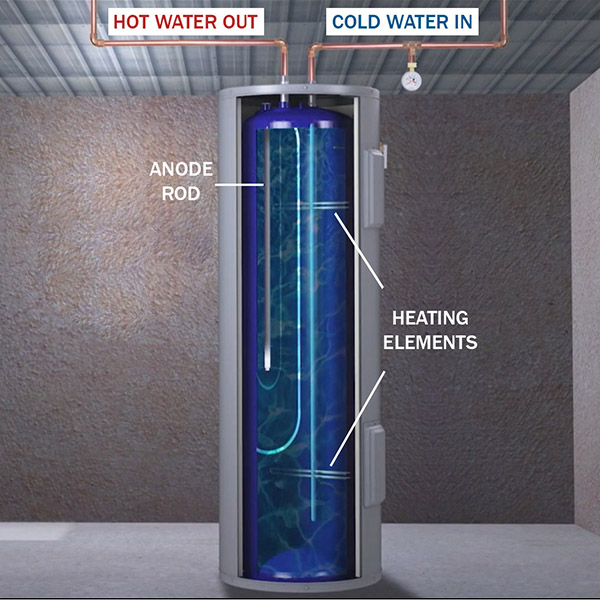
Water Heater Tank with New Anode Rod
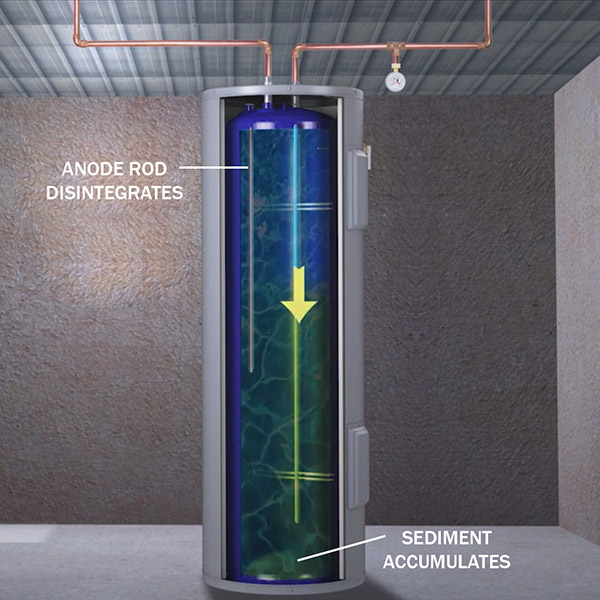
Anode Rod "Dissolves" to Protect the Tank
To help protect the tank from corrosion, a sacrificial anode rod made from aluminum, magnesium, or zinc is installed in all steel water heaters to attract damaging elements like minerals and salts that exist naturally in the water supply. In this way, they are "sacrificed" to protect the tank from corrosion.
How long an anode rod will last depends on what chemicals are in the water, how much hot water is used, and whether or not a water softener is installed. To extend the life of your water heater, we recommend inspecting the anode rod once a year.
Performing Water Heater Maintenance

Virtually every maintenance task you will perform will begin with turning off power to the water heater and turning off the flow of water to the heater. Follow these basic steps to turn off power to your unit.
Caution—Always wear gloves, goggles and other protective clothing while performing maintenance on your water heater.
Important—Make sure water heater is completely full of water before returning to service. Serious damage to the water heater or components can occur is the water heater is turned on without a full tank.
Ideally, you should turn your water heater off for a few hours before draining the tank. Turning the unit off beforehand allows the water to cool and reduces the risk of scalds. Always wear thick gloves and safety goggles to protect your skin while you drain the water heater.
Be sure you know where the main water shutoff valve is if you are only turning off the supply to the water heater. Knowing how to stop water flowing into your plumbing system can help prevent floods if you make a mistake while draining your water heater.
Turning the Water Heater Off and On

Turn off at breaker

Set pilot to "Off"


Relighting the Pilot


Good to Know
Newer water heater models have a smaller pilot light, which may be hard to see. If so, darken the room and look carefully through the sight glass in order to see the pilot light.
A gas water heater may produce condensation the first time it is lit. You may hear dripping sounds or see a small puddle of water in the drain pan. This condensation is normal and goes away once the water heater reaches its normal operating temperature.
Checking the Sacrificial Anode Rod
Sacrificial anode rods protect the inside of water heater tanks from a process called galvanic corrosion. Because water heater tanks are made from metal that’s susceptible to corrosive elements in water, the anode sacrifices itself to protect the tank. The anode freely gives up ions so electrolysis does not dissipate the steel of the tank.
Step 1 - Turn Off the Unit
Turn off the electricity to the water heater or turn off the gas to extinguish the pilot. Open a faucet to run the cold water.
Step 2 - Drain some water from the water heater.
Shut off the incoming cold water. Attach a garden hose to the drain valve. Open the drain valve and let a few gallons of water drain from the water heater. You may need a flathead screwdriver in order to open the drain valve. Close the drain valve to continue the process.


Explore our collection of A. O. Smith product literature to find the resources you need for your specific model.

Draining the Tank
Knowing how to drain a hot water heater is also an important step if you are preparing to remove and replace your unit.
Ideally, you should turn your water heater off for a few hours before draining the tank to allow the water to cool and reduces the risk of scalds. Always wear thick gloves and safety goggles to protect your skin while you drain the water heater.


Flushing the Tank
Water heater flushing is an essential part of your home maintenance routine. Over time, minerals and other substances in your water supply can cause sediment buildup inside your unit, increasing the risk of leaks, bad smells and other common water heater issues.
Sediment buildup in the tank can reduce your water heater's energy efficiency and also clog your water lines.
Refer to your owner's manual for official maintenance instructions.
Tank Water Heaters
Most types of tank water heaters require flushing at least once per year. If you live in a hard water area, you may need to flush your water heater more often. That's because hard water contains a higher concentration of minerals, increasing the risk of sediment accumulation inside your water heater.
Tankless Water Heaters
Tankless water heaters don’t require flushing because they do not have a tank; however, many tankless water heaters require descaling.
How often you should flush or descale a water heater depends on its type and model. You should always defer to the instructions in your manufacturer's handbook to maintain your water heater correctly.
Explore our collection of A. O. Smith product literature to find the resources you need for your specific model.
How to Flush the Tank


Adjusting the Temperature
Water that’s too hot or too cold is one of the most common issues with water heaters. Fortunately, this water heater maintenance issue is one of the easiest to service simply by adjusting the thermostat.


Insulating the Pipes and Unit
Part of DIY preventative water heater maintenance is weather-proofing your unit to reduce freezing risks in colder climates. Proper insulation around the pipes and tank does this and more, preventing heat loss for improved energy efficiency.

Handling Leaks and Drips
Follow these instructions on how to handle leaks and drips.
When servicing your water heater, you may find that you’re getting leaks or drips. Most leaks are caused by faulty water supply connections, so use good materials, proper techniques and check your work carefully. Compression fittings are easier to install for DIYers than copper pipes, which need to be soldered.
Drips from the temperature and pressure (T&P) relief valve discharge pipe usually mean a thermal expansion tank is needed or your water pressure is too high.
Turn off at breaker
Set pilot to "Off"


Frequently Asked Hot Water Heater Maintenance Questions
How do you maintain a tankless water heater?
Caring for a tankless water heater ensures a long lifespan. Just like with a regular water heater, these appliances need to be descaled and inspections. You should also keep watch on the inlet filter regularly to keep it free of debris.
What’s a good annual water heater maintenance checklist?
Servicing your water heater each year helps prolong its life and increase energy efficiency. Care for your unit by checking these common issues annually:
- Check for leaks.
- Flush the tank.
- Test the temperature and pressure relief valve.
- Inspect the sacrificial anode.
- Clean air intake vents.
- Check the venting system.
- Insulate the pipes and tank.
- Check thermostat settings.
- Inspect electrical connections and tighten if necessary.

Not sure which product is right for you?

Find A Local Water Heater Pro
A. O. Smith water heaters are professionally installed by local independent contractors.
Why A. O. Smith?

A. O. Smith is a leading manufacturer of both residential and commercial water heating technologies, including the #1 most specified commercial water heater.

For more than 145 years, we’ve developed state-of-the art products that push new boundaries and improve the lives of our customers.

We combine cutting-edge technology with committed people who take pride in providing the very best support for our customers.

Our products are put through rigorous quality and endurance testing so no matter where hot water is needed, A. O. Smith can provide a solution you can count on.
Frequently Asked Questions
Annual water heater maintenance should include testing the temperature and pressure relief valve, inspecting and replacing the sacrificial anode rod when deteriorated, and flushing the tank to remove sediment buildup. Additional tasks include checking for leaks, adjusting thermostat settings to 120°F, cleaning air intake vents on gas models, inspecting the venting system, and insulating pipes in cold climates. These maintenance tasks improve efficiency, extend your water heater's lifespan, and prevent costly repairs.
Yes, most homeowners can flush their water heater themselves by following the manufacturer's instructions. The process involves turning off the heating source, connecting a garden hose to the drain valve, opening the valve to release water and sediment, and continuing until the water runs clear. However, if you're uncomfortable working with gas or electricity, the drain valve is clogged, or you encounter any issues during the process, call a professional plumber for assistance. Always wear protective gear and allow the water to cool before draining.
Water heater service costs vary significantly based on your location, the type of service needed, and the condition of your unit. Basic maintenance like annual inspections and flushing typically costs less than repairs requiring parts replacement. Factors affecting cost include accessibility of your water heater, whether it's tank or tankless, and any additional issues discovered during service. For accurate pricing in your area, find a plumber near you.
The cost to flush a water heater depends on whether you do it yourself or hire a professional, your location, and the complexity of the job. DIY flushing requires only a garden hose and a few hours of time, making it essentially free. Professional flushing costs vary by region and plumber rates, with prices affected by your water heater's accessibility and whether sediment buildup has clogged the drain valve. For accurate local pricing, find a plumber near you.