TECHNICAL BULLETIN
FVIR C3 WATER HEATER FLAME ARRESTOR CLEANING INSTRUCTIONS
INCLUDED IN THIS KIT:
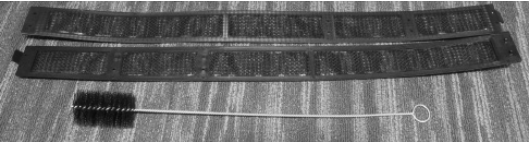
- Wrap-around style fi lter (with clips)
- Flexible cleaning brush
To perform the cleaning instructions below, the following tools/household items are needed:
- Vacuum cleaner with hose attachment (crevice tool)
CLEANING THE FLAME ARRESTOR:
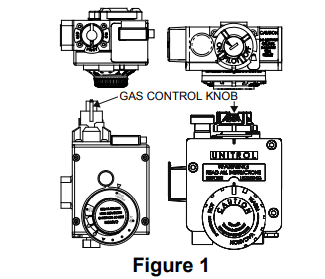
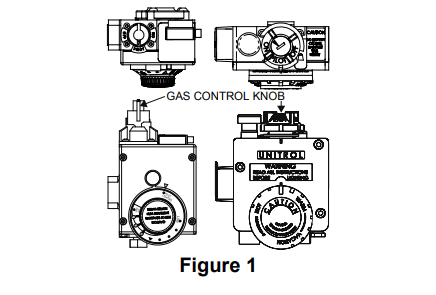
1. Turn the water heater gas control knob to “off” (See Figure 1) and allow the water heater to cool for about 15 minutes. Remove the outer door.
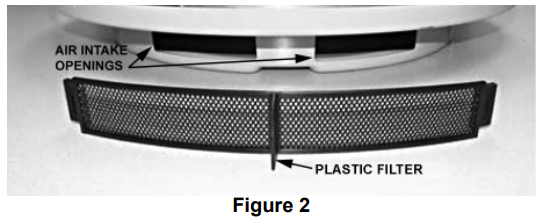
2. If your installation has the snap-in style filter shown in Figure 2, remove and set it aside.
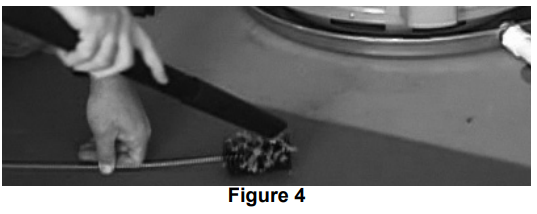
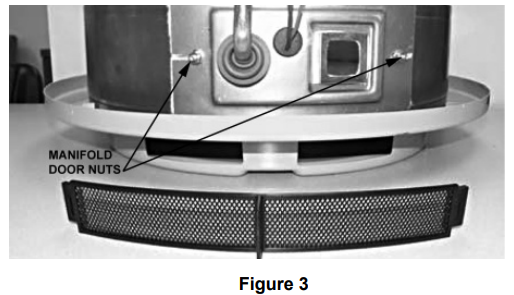
3. Insert the flexible cleaning brush into the air intake openings (See Figure 3).
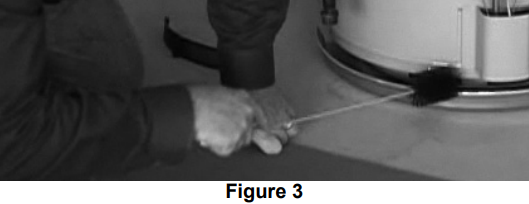
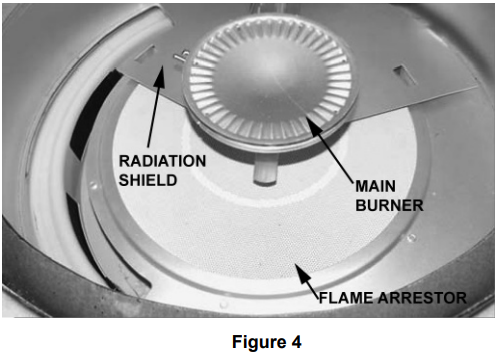
Use an in and out motion to remove dust/debris from the flame arrestor. Periodically pull the brush from the water heater and use the vacuum to remove any dust/debris from the brush. Repeat this procedure until the flexible cleaning brush does not retrieve any further dust/debris (See Figure 4).
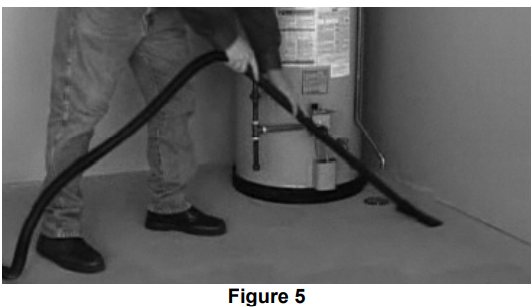
4. Once the flame arrestor is free from dust/debris, use the vacuum crevice tool to remove any dust/debris inside the base of the water heater. Also clean the area adjacent to the water heater, including the drain pan (if one is installed).
INSTALLING THE WRAP-AROUND STYLE FILTER:
NOTE: Do not use this wrap-around style filter if your water heater is installed on a pedestal or stand that does not have a solid level base or drain pan. In that case clean and reuse the original snap-in style filter.
IMPORTANT: For proper operation the water heater MUST have a filter installed, either the original snap-in style filter or a properly fitted wrap-around style filter but not both.
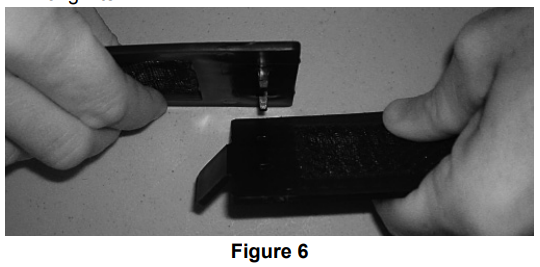
1. The wrap-around style filter has 2 primary sections
2. Connect the end sections (See Figure 6) to form one long filter.
3. Wrap the filter snuggly around the base of the water heater (See Figure 7).
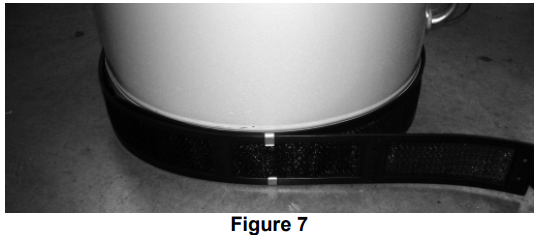
4. Use the metal clips provided in the filter kit to join the sections to form a circle. See Figure 7. Any excess filter material may be trimmed away.
5. Once the wrap-around style filter is installed make sure there are no gaps between the filter and jacket of the water heater. If gaps are present reuse the original snap-in style filter, but not both. IMPORTANT: For proper operation the water heater MUST have a filter installed, either the original snap-in style filter or a properly fitted wrap-around style filter but not both
LIGHTING THE WATER HEATER:
1. Follow the Lighting Instructions on the front of the water heater to light the unit. Once lit, verify proper operation and reattach the outer door.
2. If the pilot won’t light after repeated attempts, a service technician may be needed to perform a more thorough cleaning or to check for other issues. If you have questions, contact Residential Technical Assistance. The toll free number can be found in your manual or on the water heater’s label.
CLEANING THE WRAP-AROUND FILTER:
1. Periodically check the wrap-around filter for any dust/debris buildup on the filter screen. NOTE: If the installation environment is prone to excessive dust/ debris, such as a laundry room, it may be necessary to inspect the wrap around filter at least once a month.
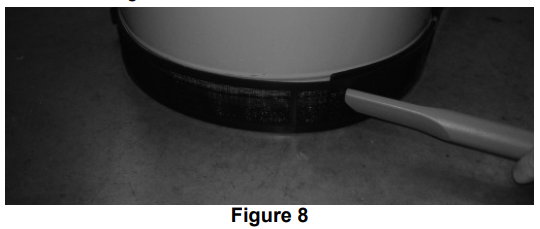
2. The filter can be cleaned using a vacuum (See Figure 8.) It is not necessary to remove the filter to clean the back sections. Simply slide the filter around the base vacuuming each section.
3. The filter can also be removed and cleaned with hand dishwashing soap and water to remove any dust or debris the vacuum could not remove. Follow steps 3-5 in “Installing the Wrap-Around Filter” to reattach the filter.
ADVANCED CLEANING INSTRUCTIONS
IMPORTANT: For correct water heater operation, it is essential that the advanced cleaning procedure be performed properly. If you lack the necessary skills to properly perform the advanced cleaning, you should not proceed, but get help from a qualifi ed person.
CLEANING THE COMBUSTION CHAMBER:
1. Turn the water heater gas control knob to “off” and allow the burner area to cool completely, approximately 15 minutes, see Figure 1.
2. Turn off the supply gas at the supply gas line if applicable.
3. Remove the outer door from around the burner tubing at the base of the water heater. Disconnect the three connections from the bottom of the gas control valve/thermostat, being careful to note their location, see Figure 2.

Do not bend the gas control valve/thermostat connections too far; doing so may result in damage.
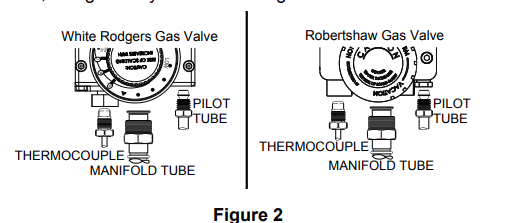
4. White-Rodgers Gas Control Valve/Thermostat: Remove the Piezo igniter (with the orange wire) from the gas valve by sliding it back toward the tank (leave the orange wire in the inner door assembly). Robertshaw Gas Control Valve/ Thermostat: Disconnect the igniter wire at the base of igniter button.
5. Remove the 3/8” manifold door nuts, holding the inner door and white gasket in place, see Figure 3.
6. Carefully remove the burner from the combustion chamber. Scale or other materials may have collected on the top of the main burner; try not to dump any debris off of the burner until it and the inner door have been removed from the heater. TAKE CARE NOT TO DAMAGE THE WHITE GASKET ON THE INSIDE OF THE INNER DOOR.
7. Inspect the radiation shield (thin circular metal sheet under the burner and above the flame arrestor), see Figure 4. If any of the sides of the radiation shield are touching the base (disrupting air fl ow), install 1/2-inch high feet under the radiation shield. To obtain the feet free of charge, contact Residential Technical Assistance referencing the number in your manual.
8. Vacuum the main assembly and pilot burner assembly. Then vacuum the top of the radiation shield located inside the burner chamber.
IMPORTANT: DO NOT use the flexible cleaning brush provided with this kit to clean the top of the flame arrestor. It may be used to clean only the bottom of the flame arrestor. Use a soft bristle brush such as a paint brush or compressed air to dislodge any dust/debris from the inside of the combustion chamber and exposed section of the flame arrestor. Remove any collected dust/debris using the vacuum. DO NOT use any hard bristle brush or any other cleaning equipment that may damage the flame arrestor.
9. Re-insert the burner taking care that the main burner tube is seated in the burner positioning bracket.
10. Carefully reposition the inner door w/gasket over the bolts on the combustion chamber. Do not tighten the nuts down until the main burner, pilot burner, and thermocouple are attached and tightened.
11. Make sure that the white fibrous door gasket is not folded over and protrudes out from the inner door in all directions.
12. Then tighten the 3/8” nuts to hold the inner door in place. Check the gas connections for proper fitting and then light the pilot, following the directions on the side of the heater.
13. Once the pilot is lit, turn the valve to the “ON” position and ignite the main flame. Brush soapy water on the gas connections and look for bubbling. This is an indication of a gas leak. If bubbles appear, shut off gas supply and check fittings. Re-light the pilot and check for leaks again, repeating the soapy water solution method. Replace the outer door.
14. Check to make sure the filter is installed properly and free from dust/debris. If the wrap-around style filter is used, make sure there are no gaps between the filter and jacket of the water heater. If gaps are present reuse the original snap-in style filter, but not both.
15. If you have questions, contact Residential Technical Assistance. The toll free number can be found in your manual or on the water heater’s label.